
Welcome to this Printer Friendly Tutorial page of
The Williams Studio - Your Creative Source
http://www.workdance.com
TUTORIAL ONE:
CREATING A BROKEN MONITOR DESKTOP IMAGE...
Create a new Photoshop document titled Broken Monitor.
The document size should be the same as your target monitor's pixel size; here, we chose 1152 X 870 pixels, and it will be scaled to fit smaller monitors after completion. The resolution is set to 72 ppi for Mac desktops. If you're building this image for a Windows desktop, set your resolution to 96 ppi. We're using RGB colorspace for desktop and web compatibility. The background is set to "transparent."
Next, Create a selection named "inner screen" at approximately 1102 X 820 pixels... the easiest way to do this is to set your selection marquis option to fixed size and enter 1102 and 820 in the boxes. Center the selection in the window. Apply "Select>Modify>Smooth" at 16 pixels to quickly radius the selection corners. (This is a really useful way to round corners for a variety of selection techniques.) It's a good idea to save your selection (Select>Save Selection) as a new channel named "inner crt."Fill the selection using the paint bucket tool with a typical monitor green color. We used R:85; G:112, B:99.
At this juncture, we have a flat green rectangle with no life or dimension. To correct this, we'll use a shortcut. Go to the Filter>Render>Lighting Effects... drop down menu to enter the Lighting Effects dialog screen. Leave the Style as default. Set the Light Type to Omni. Grab the center of the previewed Omni light area and tuck it into the upper left corner of your green area. You can tweak the lighted area by grabbing the ellipse and dragging it. The sliders should be set to give you something you like.

Remember you're trying to make the light look as though it's reflecting from a glass surface, so adjust accordingly. When you're happy with your adjustments, click OK. If you don't like the result, you can change it. Use "Command-Z," or "Undo" in the drop down Edit menu. Go through the steps again until you're happy with the result. Click OK.
Now you see some dimension to the screen. Key "Shift-Command-I" (Select>Inverse) to activate a selection from the green part of the image to the outer edges of the canvas. (You don't need to save this selection.) Use the fill or paint bucket tool to fill this area with black.
Here is what you should see:

This is a good time to save your work (Command-S). Everything up to now has been pretty quick, but it's time to slow things down...
What would you like to throw at your monitor? We chose to shoot ours for simplicity and instant gratification. Start by creating a new layer (Shift-Command-N) named "bullet holes." Next, make a few bullet holes with the airbrush. Use a brush size that looks right - for this image it's a 35 pixel brush, 100% hardness and no spacing. Now, change the airbrush drop-down option to "dissolve" and go exactly over the holes you just made. This gives them a bit of a jagged edge, and kick starts the next step.

To make the bullet holes really look ragged, you'll need to work in close with a very small brush to make them irregular (as they would appear in glass). Avoid curved lines and think zig and zag. Stay loose - "real" is not very organized. Don't leave any large pieces of glass suspended in mid air, either. Time again to save your work.

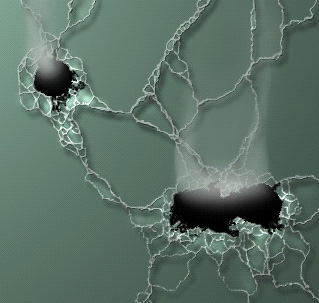
Create another new layer titled "cracking." Switch to a pure white with a very small hard brush and add cracks and "spider webbing" to the image. We used a 1 pixel brush to keep the cracks as defined as possible. This will take some time, but have fun with it. Again, do not organize too much.
A good method is to lay out some of the larger cracks first and then add intersecting ones as you go along. They won't look like cracks as much as just jagged white lines, but be attentive to shape for now. Do a save occasionally until you're finished, then save your work again. Eventually, you'll get something similar to this:

Let's add a little more dimension to this screen. Click on "Layer 1" in the layers palette. Using a really large, soft brush with the burn tool set to "midtones," at an exposure of 8 to 10, take a couple swipes along the right side of the screen to darken it a little. Now, create on final new layer titled "smoke."
Confirm that it's in front. You can do this by using the Layer>Arrange pull down menu or by simply dragging its position to the top in the layers palette. Using a light gray color, lay some smoke from the bullet holes with your airbrush tool. You'll need to adjust "pressure" and "fade X steps" to get a good result.
For the wider holes, we created a new brush. (Open the brushes palette and choose "new brush" or click on a blank brush space within the palette.) Set the new brush to a diameter of 90 pixels, hardness 100, spacing unchecked, angle 3 degrees, roundness 25% (or whatever matches your needs). With the new brush you can create a smoke trail in the double holes.
If you need to smooth out the trails, use Filter>Blur>Gaussian Blur (on the smoke layer only) and try a 6 pixel radius to start.

Finally, select the "cracking" layer and choose Layer>Effects>Drop Shadow. Check "Apply;" Try setting to "Multiply" with black as the color; 100% opacity; 128 degree angle; 7 pixel distance; 5 pixel blur at 11% intensity. Experiment. Now use the layer effects drop down to choose "Bevel and Emboss." For Highlight, check Apply; set the mode to screen (with white); 75 - 100% opacity: For the Shadow, try setting the mode to multiply; opacity to 75-100%. Style is "Inner Bevel" at a 128 degree angle. Depth is 2-5 pixels; Blur is the same. Again, experiment to get results you like.
Now for the final "tweaking" move the "cracking" layer to right above Layer 1 in the layers palette. Select the cracking layer and key "Command-E" (Layer>Arrange>Merge Down). This is done so that you can apply the dodge tool to areas of cracked glass around the bullet holes and bring out depth.
Save the image. Then save a copy in jpeg format for your desktop. You're done.
To download this tutorial (198k), Click here. You will receive a text file and a folder with the images.
What would you like to see here? Go to the Guestbook page to post your suggestions. View the Guestbook here.
All content and images within this site (with the exception of licensed characters held by their respective license owners) are ©1986-2001 Garry K. Williams / The Williams Studio, Inc.
Home | 2D | 3D | Client pages | Contacts | Downloads | Forms | Guestbook | Process